How To Validate Your Forms Server-Side With Octavalidate-PHP
How To Use OctaValidate to Validate Your Server-Side Forms

My name is Simon Ugorji and I aspire to become a computer scientist.
I officially started my web development journey in the year 2020 as a backend web Developer and I have enjoyed the experience so far.
I spend my day coding, learning new topics, and figuring out the next article to share with the world.
Form validation is very important to prevent unwanted/malformed data from being stored in your database.
One wrong input from a user can affect the whole records in a database, so it is necessary to validate all form inputs before they are stored in a database.
Recently, I built a Library that helps to validate your forms server-side with PHP, and in this tutorial, I will show you how to use it in your project.
DEMO FILE
I will work with a PHP file that submits the form post data to itself.
Here's my demo file
<html>

<body>
    <form id="form_demo" method="post" novalidate>
        <label>Username</label><br>
        <input name="username" type="text" id="inp_uname"> <br>
        <label>Email</label><br>
        <input name="email" type="email" id="inp_email"> <br>
        <label>Age</label><br>
        <input name="age" type="number" id="inp_age"> <br>
        <label>Password</label><br>
        <input name="password" type="password" id="inp_pass"> <br><br>
        <button type="submit">Run Test</button>
    </form>
</body>

</html>
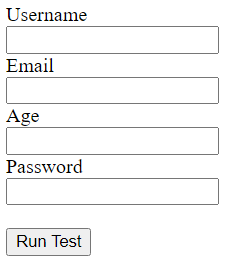
This is what the form looks like
IMPORTING THE LIBRARY
We have to download and import the validation library to our project in order to begin validation on the form.
Visit the GitHub repository and download the library
After downloading the library, this is how I will import the library to the project
//include the validation file
require 'octaValidate-php/src/Validate.php';
use Validate\octaValidate;
//create new instance of the class
$DemoForm = new octaValidate('form_demo');
Now we are ready to begin validation on the form.
DEFINING VALIDATION RULES
In order to begin validation, we need to;
- Define validation rules for the form.
- Invoke the
validateFields()method and pass in the rules as the first argument and then the form fields as the second argument
On this page, you will see a list of inbuilt validation rules, that can be used on your forms.
Here's the syntax to define validation rules for a form
//syntax for defining validation rules
$valRules = array(
  "FORM_INPUT_NAME" => array(
    ["RULE_TITLE", "CUSTOM_ERROR_MESSAGE"]
  )
);
So for the form inputs above, I want them to have these rules
- Username
- R (required)
- Email
- R (required)
- EMAIL (Checks if the value is a valid email address)
- Age
- R (required)
- DIGITS (Checks if the value is a valid digit)
- Password
- R (required)
This is how I will define the rules
//define validation rules
$valRules = array(
    "username" => array(
        ["R", "Your username is required"]
    ),
    "email" => array(
        ["R", "Your Email is required"],
        ["EMAIL", "Your Email is invalid"]
    ),
    "age" => array(
        ["R", "Your Age is required"],
        ["DIGITS", "Your Age must be in digits"]
    ),
    "password" => array(
        ["R", "Your Password is required"]
    )
);
INVOKING THE VALIDATE FIELDS METHOD
Now that we have defined the rules, we need to invoke the validateFields() method and pass in the rules as the first argument and then the form fields as the second argument.
The form fields can be the $_POST or $_GET array. It defaults to the $_POST array if no value is provided.
With this, you can choose to validate data coming from the $_POST array or from the $_GET array, or even from the $_REQUEST array.
The validateFields() method returns boolean
- true means there are no validation errors
If there are no validation errors, you are free to process the form data and probably store the data in a database
- false means there are validation errors
If there are validation errors, we need to return the errors back to the user by invoking the getErrors() method.
While returning the errors back to the user, you need to have a JavaScript function that will append the errors into the form since it is a server-side library. Luckily for us, the library comes with a helper script that is available in /frontend/helper.js.
The helper script contains 2 functions which are;
- showErrors(errorObject)
Pass in the error object to this function for the function to append the errors into the form.
- removeErrors(formId)
Pass in a form ID to this function for the function to remove any errors present within the form.
You don't need to call the
removeErrors()function if your form is submitted to the page itself or to another PHP script, because the page will reload on every submit. However, it is necessary that you call the function if you're using Ajax to process form submission.
Locate this script and include the functions there in your project.
So this is how I will handle the result of the validateFields() method
//begin validation
if ( $DemoForm->validateFields($valRules, $_POST) === true ){
    //process form data here
}else{
    //retrieve & display errors
    print('<script>
        window.addEventListener(\'load\', function(){
            showErrors(' . $DemoForm->getErrors() . ');
        })
    </script>');
}
Here's the full code of the demo page
<?php
//require library
require 'octaValidate-php/src/Validate.php';
use Validate\octaValidate;
//create new instance of the class
$DemoForm = new octaValidate('form_demo');

//define validation rules
$valRules = array(
    "username" => array(
        ["R", "Your username is required"]
    ),
    "email" => array(
        ["R", "Your Email is required"],
        ["EMAIL", "Your Email is invalid"]
    ),
    "age" => array(
        ["R", "Your Age is required"],
        ["DIGITS", "Your Age must be in digits"]
    ),
    "password" => array(
        ["R", "Your Password is required"]
    )
);

if ($_POST) {
    //begin validation
    if ( $DemoForm->validateFields($valRules, $_POST) === true ) {
        //process form data here
        print('<script> alert("NO VALIDATION ERROR") </script>');    }
    else {
        //retrieve & display errors
        print('<script>
            window.addEventListener(\'load\', function(){
                showErrors(' . $DemoForm->getErrors() . ');
            })
        </script>');
    }
}
?>
<html>

<body>
    <form id="form_demo" method="post" novalidate>
        <label>Username</label><br>
        <input name="username" type="text" id="inp_uname" value="<?php ($_POST && $_POST['username']) ? print($_POST['username']) : '' ?>"> <br>
        <label>Email</label><br>
        <input name="email" type="email" id="inp_email" value="<?php ($_POST && $_POST['email']) ? print($_POST['email']) : '' ?>"> <br>
        <label>Age</label><br>
        <input name="age" type="number" id="inp_age" value="<?php ($_POST && $_POST['age']) ? print($_POST['age']) : '' ?>"> <br>
        <label>Password</label><br>
        <input name="password" type="password" id="inp_pass" value="<?php ($_POST && $_POST['password']) ? print($_POST['password']) : '' ?>"> <br><br>
        <button type="submit">Run Test</button>
    </form>
    <script src="octaValidate-php/frontend/helper.js"></script>
</body>

</html>
Let us submit the form and check if all is working as expected, shall we? 🙂
When I hit the submit button, this is what I see
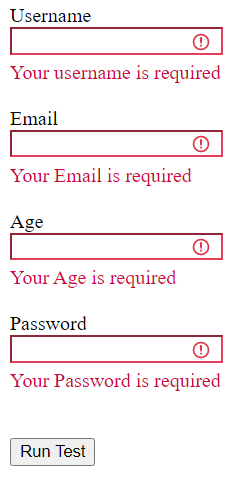
That is for the required rule which checks if values are submitted. Now let us enter random values for the inputs and hit the submit button again.
This is what I see
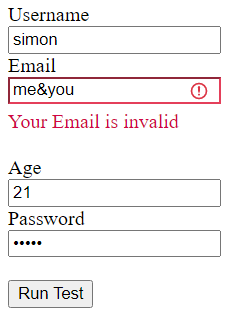
That is for the email rule which checks if a valid email was submitted.
Now, we have covered the basics. Let us define custom rules that will handle validations for username and password.
DEFINING CUSTOM RULES
Aside from the inbuilt validation rules, you have the power to define custom rules and the rules will be processed as if they were inbuilt rules.
To define a custom rule, you need;
- The Rule Title,
- The Regular Expression and
- The Error Text
These are the 2 methods that can be used to define custom rules;
customRule()moreCustomRules()
The first method allows us to define a single rule and the second method allows us to define multiple rules.
I will use the second method because it allows us to define multiple rules.
For the sake of this article, I will define simple rules that will allow the user to enter "simon" for the username field and "12345" for the password field.
//custom rules
$customRules = array(
    "UNAME" => ['/simon/', "You must enter simon"],
    "PASS" => ['/12345/', "You must enter 12345"]
);
//build the rules
$DemoForm->moreCustomRules($customRules);
Now let us place the code just before we define validation rules for the form, then we will provide only the rule title on the validation rules.
//custom rules
$customRules = array(
    "UNAME" => ['/simon/', "You must enter simon"],
    "PASS" => ['/12345/', "You must enter 12345"]
);
//build the rules
$DemoForm->moreCustomRules($customRules);

//redefine validation rules
$valRules = array(
    "username" => array(
        ["R", "Your username is required"],
        ["UNAME"]
    ),
    "email" => array(
        ["R", "Your Email is required"],
        ["EMAIL", "Your Email is invalid"]
    ),
    "age" => array(
        ["R", "Your Age is required"],
        ["DIGITS", "Your Age must be in digits"]
    ),
    "password" => array(
        ["R", "Your Password is required"],
        ["PASS"]
    )
);
Now let us submit the form again with random values.
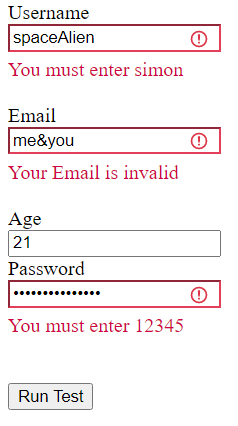
From the image above, you can see that the error message that we defined alongside the rule, worked as expected.
ATTRIBUTE VALIDATION
For my last validation, I will show you how you can perform attribute validation.
Generally, all attribute validation allows you to provide a rule title eg "MAXSIZE", a value for the rule eg "5MB", and an error message eg "your file must not exceed 5MB"
All attributes validation follows the syntax below
//syntax
$valRules = array(
  "FORM_INPUT_NAME" => array(
    ["ATTRIBUTE_TITLE", "VALUE", "CUSTOM_ERROR_MESSAGE"]
  )
);
You can use this type of validation to validate; length, minlength, maxlength, size, minsize, maxsize, equalto, files, minfiles, maxfiles.
I will use the length validation on the Age form input because we want the user to provide just 2 digits.
So to add the length validation to the form's age validation rules, I will do something like this;
$valRules = array(
    "age" => array(
        ["LENGTH", "2", "Your age must be 2 digits"]
    )
);
Here are the validation rules for the demo page
//define validation rules
$valRules = array(
    "username" => array(
        ["R", "Your username is required"],
        ["UNAME"]
    ),
    "email" => array(
        ["R", "Your Email is required"],
        ["EMAIL", "Your Email is invalid"]
    ),
    "age" => array(
        ["R", "Your Age is required"],
        ["DIGITS", "Your Age must be in digits"],
        ["LENGTH", "2", "Your age must be 2 digits"]
    ),
    "password" => array(
        ["R", "Your Password is required"],
        ["PASS"]
    )
);
So let us enter random values and hit the submit button
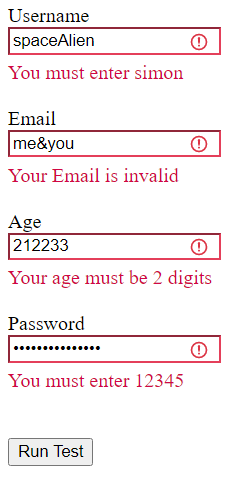
You can see an error message telling us that our age must be 2 digits. Let us provide the correct values for all form inputs and submit the form again.
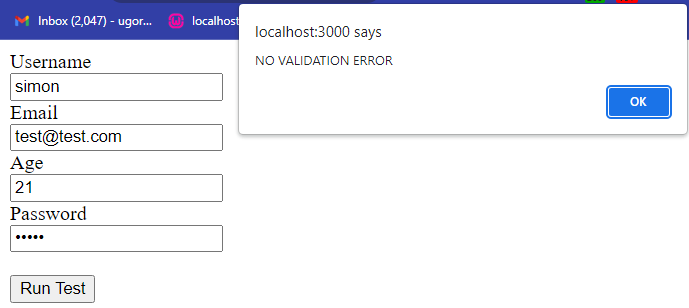
No validation error! So the library works perfectly 😎
DOCUMENTATION
There are more validations on the documentation page. Please visit the documentation below to learn more about this Library
EXTRA
Do you want to use this library for front-end form validation? Visit the documentation below to learn how you can easily set up frontend validations on your HTML forms using Octavalidate-JS.
Do you want to use this library for both front-end & back-end form validation? Visit the documentation page below to see how smooth front-end & back-end validation is with this library.
Image credit: Ben Griffiths on Unsplash
That would be all for now,
Thank you.


