Client-Side Form Validation Using octaValidate - JavaScript

My name is Simon Ugorji and I aspire to become a computer scientist.
I officially started my web development journey in the year 2020 as a backend web Developer and I have enjoyed the experience so far.
I spend my day coding, learning new topics, and figuring out the next article to share with the world.
octaValidate is a script that I developed to help validate your HTML forms using validation rules, sophisticated regular expressions, and form input attributes.
If you’re worried about Client-side Form validation, this script covers it 100%.
Let's Get Started
Download the script from my GitHub repo and import it to your project.
Now link the script on your page.
<script src="octaValidate/src/validate.js"></script>
SAMPLE REGISTRATION FORM
Let’s create a simple registration form, where we would be validating the user’s username, email address, and password.
<!doctype html>
<html>
    <head>
        <script src="octaValidate/src/validate.js"></script>
    <style>
        label{
            font-size: 1em;
            display: block;
            margin-bottom: 5px;
        }
        input,textarea{
            display: block;
            border-radius: 5px;
            background-color: #fcfcfc !important;
            border: 2px solid #aaaaaa;
            width: 250px !important;
            padding: 10px;
        }
        div.form-group{
            margin:10px 0 10px 0;
            width: 100%;
        }
        button{
            all:unset;
            text-align: center;
            padding: 10px;
            color: #fff;
            cursor: pointer;
            background-color:#ff2600;
            width:250px;
        }
        .form{
            padding:20px;
            border:1px solid #ddd;
            width:300px;
        }
    </style>
    </head>
    <body>

        <form class="form" id="form_register" method="post">
        <div class="form-group">
            <label>Username</label>
            <input id="inp_uname" type="text" placeholder="Your Username">
        </div>
        <div class="form-group">
            <label>Email</label>
            <input id="inp_email" type="email" placeholder="Your Email Address">
        </div>
        <div class="form-group">
            <label>Password</label>
            <input id="inp_pwd" type="password" placeholder="Your Password">
        </div>
        <div class="form-group">
            <label>Re-enter Password</label>
            <input id="inp_pwd2" type="password" placeholder="Re-enter your Password">
        </div>
        <div class="form-group">
            <button type="submit">REGISTER</button>
        </div>
        </form>
    </body>
</html>
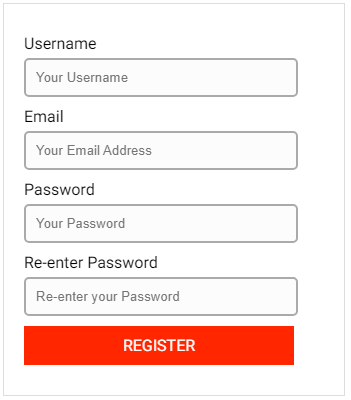
Here’s what the form looks like
ADDING THE ATTRIBUTE OCTAVALIDATE
Based on the validation rules that we wish to apply to an input element, we need to add the attribute octavalidate to the input element, then provide our validation rules within it.
Here are some of the validation rules that we will be needing:
- R: A value must be provided on the input.
- EMAIL: The value provided must be a valid email address.
- USERNAME: The value may contain letters, numbers, a hyphen, or an underscore.
There are other validation rules listed in the ReadMe file.
Now let us add these validation rules inside the attribute octavalidate.
<!doctype html>
<html>
<body>
<form class="form" id="form_register" method="post">
    <div class="form-group">
        <label>Username</label>
        <input octavalidate="R,USERNAME" id="inp_uname" type="text" placeholder="Your Username">
    </div>
    <div class="form-group">
        <label>Email</label>
        <input octavalidate="R,EMAIL" id="inp_email" type="email" placeholder="Your Email Address">
    </div>
    <div class="form-group">
        <label>Password</label>
        <input octavalidate="R,PASS" id="inp_pwd" type="password" placeholder="Your Password">
    </div>
    <div class="form-group">
        <label>Re-enter Password</label>
        <input octavalidate="R" id="inp_pwd2" type="password" placeholder="Re-enter your Password">
    </div>
    <div class="form-group">
        <button type="submit">REGISTER</button>
    </div>
</form>
</body>
</html>
You can see that the form inputs were modified to have the attribute octavalidate and a list of validation rules specified within the attribute.
At the moment, when you click on the register button, nothing happens. The form would probably submit. This is because we have not done anything yet in JavaScript.
BEGIN VALIDATION
To begin validation on a particular form, we need to;
- Create a new instance of the function octaValidate, and pass in the form Id as the first argument, then any configuration option as the second argument.
let formVal = new octaValidate('form_register');
- Then invoke the validate() method to begin validation.
formVal.validate();
The return type of this method is boolean.
- true: This means that there are no validation errors
- false: This means that there are validation errors
In our case, we want the form to validate when it is submitted.
So this is what I will do.
//create new instance of octavalidate
let formVal = new octaValidate('form_register');
//attach event listener
document.querySelector('#form_register').addEventListener('submit', function(e){
    //prevent default action
    e.preventDefault();
    //invoke the validate method
    if(formVal.validate() === true){
        //validation successful
        alert('form has been submitted');
    }else{
        //validation failed
    }
})
Here’s the full code
<!doctype html>
<html>
<head>
  <script src="octaValidate/src/validate.js"></script>
    <style>
        label{
            font-size: 1em;
            display: block;
            margin-bottom: 5px;
        }
        input,textarea{
            display: block;
            border-radius: 5px;
            background-color: #fcfcfc !important;
            border: 2px solid #aaaaaa;
            width: 250px !important;
            padding: 10px;
        }
        div.form-group{
            margin:10px 0 10px 0;
            width: 100%;
        }
        button{
            all:unset;
            text-align: center;
            padding: 10px;
            color: #fff;
            cursor: pointer;
            background-color:#ff2600;
            width:250px;
        }
        .form{
            padding:20px;
            border:1px solid #ddd;
            width:300px;
        }
    </style>
</head>
<body>
<form class="form" id="form_register" method="post">
    <div class="form-group">
        <label>Username</label>
        <input octavalidate="R,USERNAME" id="inp_uname" type="text" placeholder="Your Username">
    </div>
    <div class="form-group">
        <label>Email</label>
        <input octavalidate="R,EMAIL" id="inp_email" type="email" placeholder="Your Email Address">
    </div>
    <div class="form-group">
        <label>Password</label>
        <input octavalidate="R,PASS" id="inp_pwd" type="password" placeholder="Your Password">
    </div>
    <div class="form-group">
        <label>Re-enter Password</label>
        <input octavalidate="R" id="inp_pwd2" type="password" placeholder="Re-enter your Password">
    </div>
    <div class="form-group">
        <button type="submit">REGISTER</button>
    </div>
</form>
<script>
//create new instance of octavalidate
let formVal = new octaValidate('form_register');
//attach event listener
document.querySelector('#form_register').addEventListener('submit', function(e){
    //prevent default action
    e.preventDefault();
    //invoke the validate method
    if(formVal.validate() === true){
        //validation successful
        alert('form has been submitted');
    }else{
        //validation failed
    }
})
</script>
</body>
</html>
Testing the form
Now let us test our registration form. Copy the code above and paste it into your code editor.
This is what I get when I click on the submit button
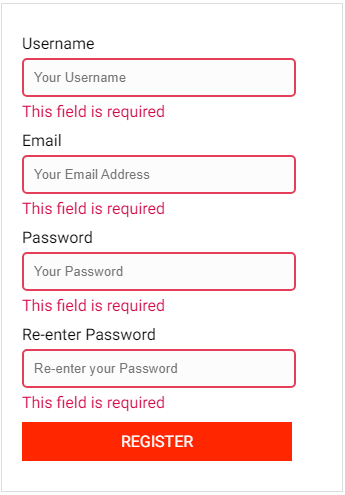
Perfect!
Which validation rule do you think is playing out here?
You’re correct. It's the required rule (R).
If you look at the validation rules applied to the form inputs, you will notice that all of them have R which stands for the required rule.
We can change the validation message by using the attribute ov-required:msg.
Here’s what the form looks like
<form class="form" id="form_register" method="post">
    <div class="form-group">
        <label>Username</label>
        <input id="inp_uname" type="text" octavalidate="R,USERNAME" ov-required:msg="Your username is required" placeholder="Your Username">
    </div>
    <div class="form-group">
        <label>Email</label>
        <input id="inp_email" type="email" octavalidate="R,EMAIL" ov-required:msg="Your email address is required"  placeholder="Your Email Address">
    </div>
    <div class="form-group">
        <label>Password</label>
        <input id="inp_pwd" type="password" octavalidate="R,PASS" ov-required:msg="Your password is required"  placeholder="Your Password">
    </div>
    <div class="form-group">
        <label>Re-enter Password</label>
        <input id="inp_pwd2" type="password" octavalidate="R" ov-required:msg="Please re-enter your password" placeholder="Re-enter your Password">
    </div>
    <div class="form-group">
        <button type="submit">REGISTER</button>
    </div>
</form>
If we submit the form again, here’s what you will see

Notice that the message is no longer “This field is required”, but it has been replaced with a custom message.
CUSTOM VALIDATION RULES
I’m sure that you must have played with the form but did you notice that out of the two validation rules [R, PASS] provided for the password input, only the required rule was functional?
Yes, you read that right! And this is because, PASS which is also a validation rule, doesn’t exist yet.
One cool feature of octaValidate is that you have all the power to create your own validation rules.
Now let us define a custom validation rule named PASS which we will use to validate the password input.
To define a custom validation rule, we will invoke the method customRule(), then pass in the arguments (RULE_TITLE, REG_EXP, ERROR_TEXT).
- RULE_TITLE: This is the custom validation rule itself
- REG_EXP: This is the regular expression that will be used on this validation rule
- ERROR_TEXT: This is the message that the user will see if, during validation, this rule fails.
Since this is a sample registration form, I would want the user to provide 12345 as the password, here’s a regular expression for that /^12345+$/.
So I will invoke the method like this :
formVal.customRule('PASS', /^12345+$/, 'Enter 12345');
In JavaScript when constructing or using regular expressions, we don't have to provide the expression as a string. The JavaScript engine natively recognizes regular expressions.
Here’s what our script will look like, with the custom rule defined.
//create new instance of octavalidate
let formVal = new octaValidate('form_register');
//define custom rule
formVal.customRule('PASS', /^12345+$/, 'Enter 12345');
//attach event listener
document.querySelector('#form_register').addEventListener('submit', function(e){
    //prevent default action
    e.preventDefault();
    //invoke the validate method
    if(formVal.validate() === true){
        //validation successful
        alert('form has been submitted');
    }else{
        //validation failed
    }
})
TESTING OUT OUR CUSTOM RULE
Now let us save the file and submit the form again. This time, we will provide values for the form inputs.
This is what I get
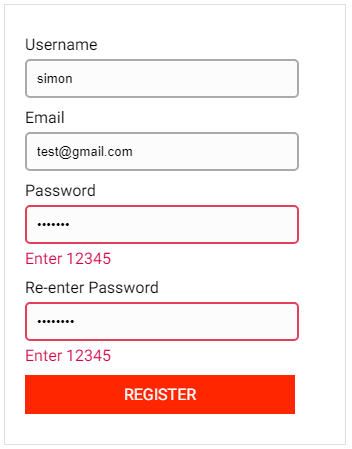
You can see that I got a message to provide 12345 because the value I provided wasn’t what the validation rule needed.
You can add more custom validation rules using a single method. Check out the ReadMe file for implementation.
FORM INPUT ATTRIBUTES
Now we need to make sure that the user is providing exactly the same value in the password field, to the password re-enter field using the equalto attribute.
Here’s the password input and password re-enter fields
<div class="form-group">
    <label>Password</label>
    <input octavalidate="R,PASS" ov-required:msg="Your password is required" id="inp_pwd" type="password" placeholder="Your Password">
</div>
<div class="form-group">
    <label>Re-enter Password</label>
    <input octavalidate="R" equalto="inp_pwd" ov-required:msg="Please re-enter your password"
        ov-eqaulto:msg="Both passwords do not match" id="inp_pwd2" type="password" placeholder="Re-enter your Password">
</div>
Then if we submit the form, providing a wrong value for the re-enter password field, this is what I get.
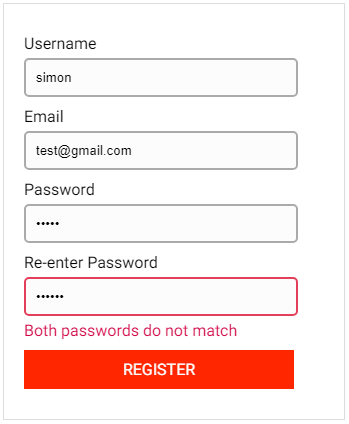
This happened because we provided the id of the password input as a value for equalto attribute on the re-enter password field, and by doing so, the re-enter password field is checking its value against the value of the password field.
You can also use the length attributes to validate the max-length, min-length, or length of form input values.
Read more about length validation in the ReadMe File
CALLBACK FEATURE
Now we can define a function that will execute when form validation fails, or when a form validation passes.
To use the callback feature, define a function, and pass it as an argument to this method validateCallBack().
Here’s how to invoke the method.
formVal.validateCallBack(success_callback, error_callback);
STATUS FEATURE
You can check the number of validation errors on a particular form by invoking the status() method.
formVal.status();
CONFIGURATION OPTIONS
There are two default configuration options that you can tweak to get the most out of this powerful script.
- successBorder: This option enables a green success border on a particular element if its validation is successful.
- strictMode: This option trims extra white space at the start and end of the form inputs and prevents the user from providing special keywords as a value.
Here’s how to use it.
let formVal = new octaValidate(FORM_ID, CONFIGURATION);
The two options are disabled by default, to enable them, we need to pass it as the second argument to the function instance.
Here’s the updated script
//create new instance of octavalidate
let formVal = new octaValidate('form_register', {successBorder : true, strictMode : true});
//define custom rule
formVal.customRule('PASS', /^12345+$/, 'Enter 12345');
//attach event listener
document.querySelector('#form_register').addEventListener('submit', function(e){
    //prevent default action
    e.preventDefault();
    //invoke the validate method
    if(formVal.validate() === true){
        //validation successful
        alert('form has been submitted');
    }else{
        //validation failed
    }
})
So let us try to submit the form again by providing null, NaN, or undefined as a value.
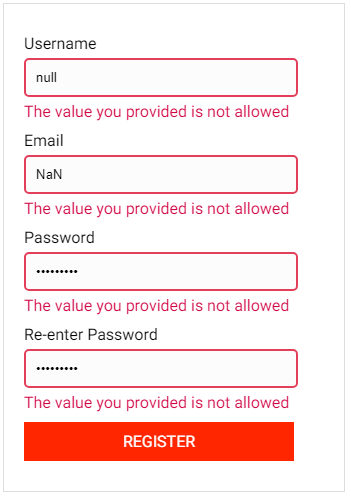
You can see our strict mode actually playing out.
Now, let us check if the success border works by providing a correct value for the username field.
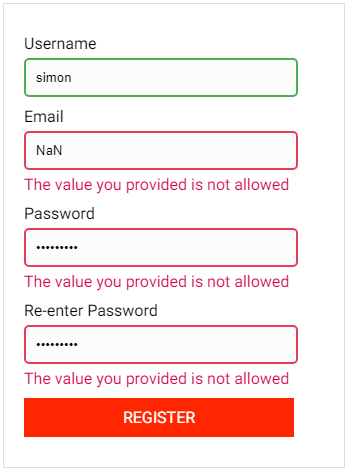
It works!
There are lots of things to do with this powerful script.
DEMO VIDEO
Here’s a video of how I validated my form.
You can test out the live demo form on this demo page.
Read more about this powerful script and how to use it, in the ReadMe file.
REFERENCE METHODS
- validate(): This method will begin validation of the form
- customRule(): This method allows you to define your custom validation rule
- validateCallBack(): This method allows you to define a callback function.
- status(): Use this method to check the number of validation errors on a form.
Feel free to contribute to the repo!
I would love to read your suggestions and features on how we can improve this script.
It's launch day 🎉🎉🎉 Check out octaValidate on product hunt
Thank you for reading.


