4 Ways To Add CSS Styles To Your NextJS Project

My name is Simon Ugorji and I aspire to become a computer scientist.
I officially started my web development journey in the year 2020 as a backend web Developer and I have enjoyed the experience so far.
I spend my day coding, learning new topics, and figuring out the next article to share with the world.
Today, I am going to share a very brief and concise article that explains the 4 ways you can add CSS styles to your NextJS Component and when you should use each of the steps that I will share.
I will dive into the steps, assuming that you already have a NextJS project already configured. However, if you need a guide on setting up one, please refer to this article on nextjs.org
STEP 1: Using Objects
We all know that a CSS declaration is a key-value pair of a CSS property and its value.
This is to say that if you want to change the color of an element and increase its size, let's say a paragraph, you could use the CSS declaration below;
p {
    color: red;
    font-size: 1rem;
}
Now, from the above example, you can see that this already resembles an object in JavaScript except that it is missing a few things from being considered an object in JavaScript.
Do you need help with JavaScript objects? Check out this link to W3Schools
When declaring CSS styles as an object, you have to follow strictly;
- The guide on how objects are declared in JavaScript.
Make sure that the property name is written in camelCase.
Make sure the property value is defined (if it is a variable) or enclosed within strings (if it is not a variable).
Assuming I have the component below;
//page.js

export default function Test(){
    return(
        <main>
            <div>
                <p>The Sun</p>
            </div>
        </main>
    )
}
If I want to add the styles as an object, I will create an object called styles within my component, and then within this object, I will have properties which are also objects containing the CSS declaration for the component.
This is what it would look like
//page.js

const styles = {
    main : {
        minHeight : '100vh',
        display : 'flex',
        justifyContent: 'center',
        flexDirection: 'column',
        alignItems : 'center'
    },

    div : {
        height : '250px',
        borderRadius : '50%',
        width : '250px',
        display : 'flex',
        justifyContent : 'center',
        flexDirection : 'column',
        alignItems : 'center',
        backgroundColor: '#F28C38',
        boxShadow : '0px 0px 17px 1px #f28c38'
    },

    p : {
        fontSize : '1.5rem',
        fontWeight : '700'
    }
}
Now, if I wanted to attach the CSS declarations to my component, I would add them like this, taking note that I am using inline styling on the elements within this component.
//page.js

export default function Test(){
    return(
        <main style={styles.main}>
            <div style={styles.div}>
                <p style={styles.p}>The Sun</p>
            </div>
        </main>
    )
}
Now, the only downside of this step is that you have to write long lines of CSS declarations and then you have to attach them inline to the element and this means that it may not be overridden by other CSS files.
I would recommend you use this for very short content like creating a banner etc., however, I am not the judge of your project 😏
STEP 2: Using Inline CSS
This step is very similar to the previous one except that you don't have to use an object to add your CSS declarations, you just add them directly to the elements.
This is how the component would look like if you used inline styling on the elements.
//page.js

export default function Test() {
    return (
        <main style={{
            minHeight: '100vh',
            display: 'flex',
            justifyContent: 'center',
            flexDirection: 'column',
            alignItems: 'center'
        }}>
            <div style={{
                height: '250px',
                borderRadius: '50%',
                width: '250px',
                display: 'flex',
                justifyContent: 'center',
                flexDirection: 'column',
                alignItems: 'center',
                backgroundColor: '#F28C38',
                boxShadow: '0px 0px 17px 1px #f28c38'
            }}>
                <p style={{
                    fontSize: '1.5rem',
                    fontWeight: '700'
                }}>The Sun</p>
            </div>
        </main>
    )
}
The previous step looks more organized but is still not the best way to add styles to your project unless you're using it for a small component or content.
STEP 3: Using Global CSS
This is the most common way to apply CSS declarations to your elements because you have to declare global styling for all elements using class names, IDs, or even the element's name.
This step is mostly used if you're using a CSS framework like Bulma, Bootstrap, or even your own framework.
To make use of this step, you just need to have a readily available CSS file or you create yours like the sample below and save it anywhere within your project, probably within the styles directory;
/*globals.css*/

.main{
    min-height: 100vh;
    display: flex;
    justify-content: center;
    flex-direction: column;
    align-items: center;
}

.div{
    height: 250px;
    border-radius: 50%;
    width: 250px;
    display: flex;
    justify-content: center;
    flex-direction: column;
    align-items: center;
    background-color: #f28c38;
    box-shadow: 0px 0px 17px 1px #f28c38;
}

.main .div p{
    font-size: 1.5rem;
    font-weight: 700;
}
Then in the root layout of your project layout.js, import this CSS file just as it is without the need for destructuring it.
//layout.js

import './styles/globals.css' //import the styles to be applied globally

export const metadata = {
  // ..meta stuff here
}

export default function RootLayout({ children }) {
  return (
    <html lang="en">
      <body>{children}</body>
    </html>
  )
}
By doing this, every element within this project that has the class name main will have the styling declared in globals.css applied to it and the same goes for every other class name declared within the file.
STEP 4: Using CSS Modules
In this step, I will create a file within the project directory and then save the file as [my_file_name].module.css.
If you are familiar with CSS classes, you would notice that there is a very high chance of using a class name that has been declared elsewhere especially if you're using a CSS framework and the styling may conflict with yours - and this is called CSS naming conflicts.
With modules, this problem is solved because when you add the class name, the compiler obfuscates this name and may add random characters to it and they will still have the original CSS declarations.
Here's how NextJS explained CSS Modules;
With modules you get to create locally scoped CSS classes to avoid naming conflicts and improve maintainability.
I have my module file as page.module.css and these are the CSS declarations;
/*page.module.css*/

.main{
    min-height: 100vh;
    display: flex;
    justify-content: center;
    flex-direction: column;
    align-items: center;
}

.div{
    height: 250px;
    border-radius: 50%;
    width: 250px;
    display: flex;
    justify-content: center;
    flex-direction: column;
    align-items: center;
    background-color: #f28c38;
    box-shadow: 0px 0px 17px 1px #f28c38;
}

.main .div p{
    font-size: 1.5rem;
    font-weight: 700;
}
If I wanted to add the class names to my component, I would first import this file as styles and then access the declarations using their names.
Here's how to use CSS modules within your component;
//page.js

import styles from './page.module.css'

export default function Test(){
    return(
        <main className={styles.main}>
            <div className={styles.div}>
                <p className={styles.p}>The Sun</p>
            </div>
        </main>
    )
}
Now if you followed the steps above correctly and you load up this project in your browser, you should see the sun, happily shining in our lives below 😃;

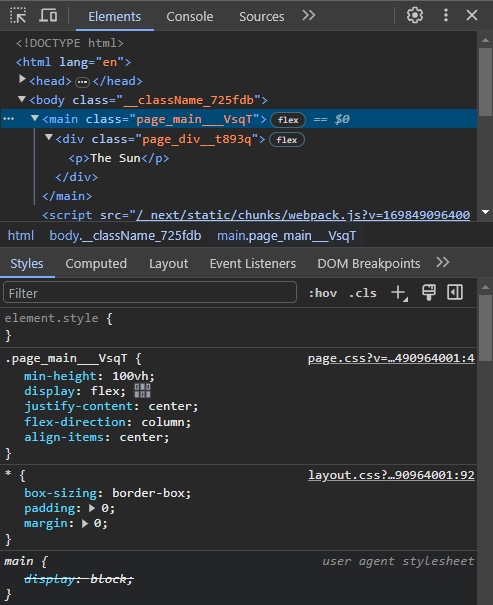
Then if you inspect the elements, you will see that the class names are obfuscated and the original styling still remains.
CONCLUSION
I hope I have been of help to you today.
If you have questions, contributions or have something you would like to share with me, please go ahead to drop a comment or send me a DM on LinkedIn or Twitter and I will be in touch.
This is the repo used for this article.
Thank you for reading!
Image credit: FONG On Unsplash


